

Advertising > Ad Platforms
Google Ads Demo
Demo: track clickout as a conversion and build a Google Ads campaign around it.
Overview
We built a simple page with one Buy button. Now let's serve it in a Google ad, with a goal of clicking out.
This demo assumes the page itself already exists. From here, we'll work in roughly this order:
- Create a conversion action in Google Ads, so it knows what counts as a sale.
- Send that conversion from the page, using Custom JS or GTM (pick one).
- Test it, so we know it's actually firing before serving the ad.
- Optional: Modify tracking to one specific button.
- Build the campaign that will actually use this conversion.
The ad and campaign come last, once tracking is confirmed working end to end, not first.
Recap: Three tools, three jobs
- Google Ads is where the ad runs and where you define what counts as a conversion.
- GTM (Google Tag Manager) is the messenger that tells Google Ads a conversion happened.
- GA4 is for analytics
You only need a Google Ads account to run Google Ads. GTM and GA4 are optional.
Connect your account first
This demo assumes your Google Ads account is already connected. See Google Ads Overview if you haven't.
Create the Conversion Action
Choose what you're measuring
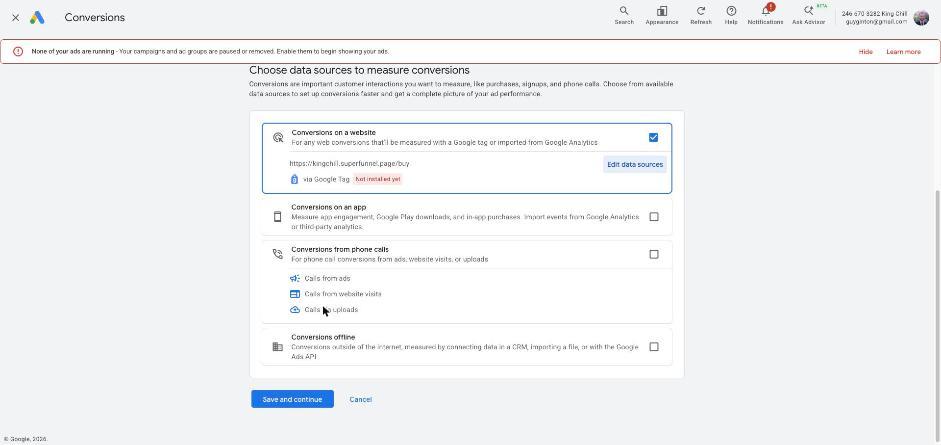
In Google Ads, go to Goals > Create conversion action. Choose what kind of conversion you're measuring: a website, an app, phone calls, or an offline source like a CRM import. We picked Conversions on a website, since ours happens right on the page.
Enter your page and choose a tag
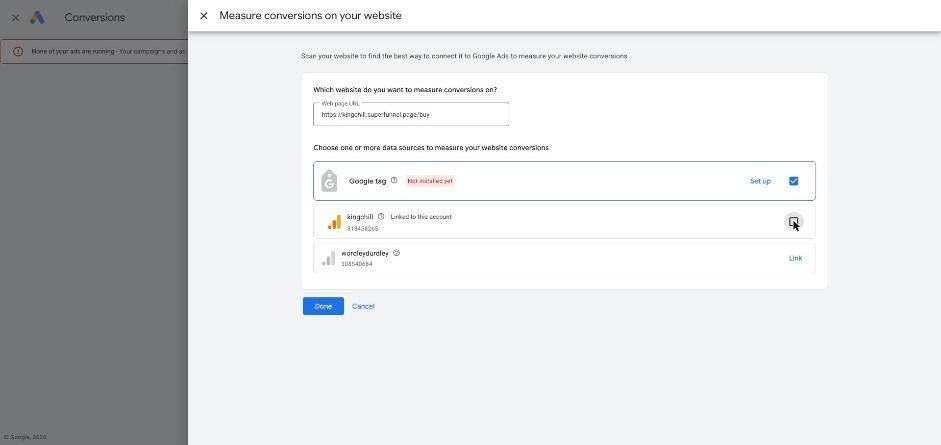
Enter your page URL, and choose Google tag as the data source.
Optional: Uncheck GA4 if it shows up here
If a GA4 property is already linked to this account, it may appear pre-selected here. In this demo we uncheck it to avoid double count. We use JavaScript or GTM alone.
Choose a conversion goal and action type
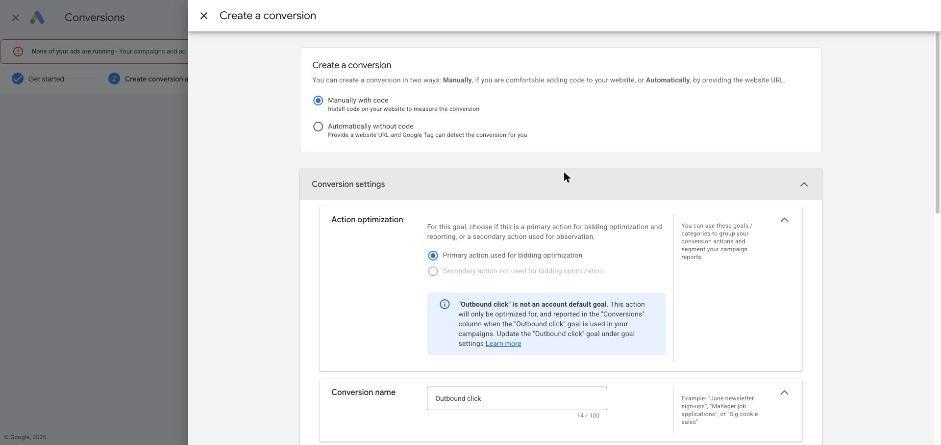
Category: Outbound click, since our conversion is a click to an outbound link. Choose Manually with code, then set the action as a Primary action.
Pick the goal that matches your conversion
Google offers several goals here beyond Outbound click. Choose whichever actually describes what happens when someone converts. Selling directly on the page using Shopify? Use Purchase.
Set value and count
Use the same value for each conversion, and set Count to One. Skip enhanced conversions.
Copy the Conversion ID and Label
On the Use Google Tag Manager tab, copy the Conversion ID and Label. In this example, Conversion ID 18157817080 and Label Z2L0CP_Oo4odEPiZqdJD. Yours will be different.

Send the Conversion
There are two ways to do this: a short script you paste in yourself, or a setup in Google Tag Manager.
Option A, Custom JS
Add Custom Code to the account or page level. See Custom Code for more info.
This script comes straight from Google Ads, not GTM. It's the same "Manually with code" snippet Google showed us back in Create the Conversion Action. We asked the SuperAgent to add it to the page's Head, a Google tag plus a click listener that sends the conversion and waits up to a second before navigating:
<script async src="https://www.googletagmanager.com/gtag/js?id=AW-18157817080"></script>
<script>
window.dataLayer = window.dataLayer || [];
function gtag(){dataLayer.push(arguments);}
gtag('js', new Date());
gtag('config', 'AW-18157817080');
document.addEventListener('click', function (e) {
  var a = e.target.closest('[data-button-id="898a581c"]');
  if (!a || a.dataset.sent) return;
  a.dataset.sent = '1';
  var go = function () { window.location.href = a.href; };
  gtag('event', 'conversion', {
    send_to: 'AW-18157817080/Z2L0CP_Oo4odEPiZqdJD',
    event_callback: go,
  });
  setTimeout(go, 1000);
});
</script>A couple of things worth understanding in this script:
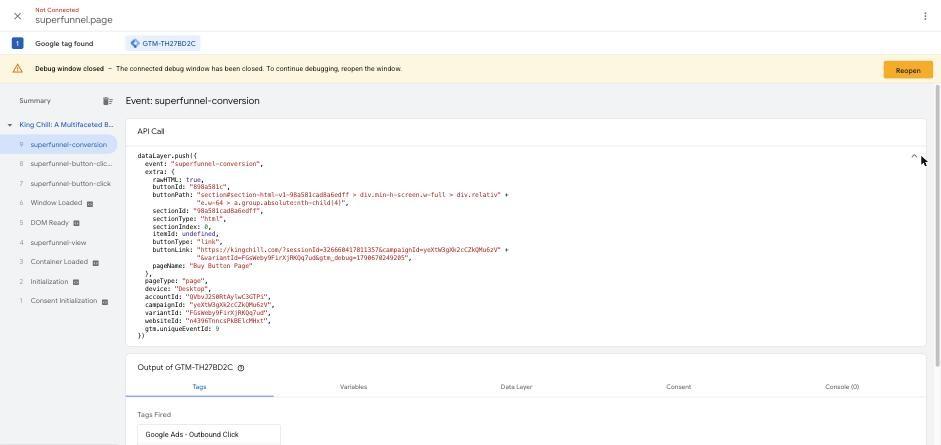
send_to: 'AW-18157817080/Z2L0CP_Oo4odEPiZqdJD'tells Google Ads which conversion to credit. The first part,AW-18157817080, identifies your Google Ads account. The second part,Z2L0CP_Oo4odEPiZqdJD, is the Conversion Label from Copy the Conversion ID and Label above, it identifies this specific conversion action.data-button-id="898a581c"is an ID SuperFunnel automatically adds to every button on your page, so a script can target one specific button reliably instead of relying on its text or position, either of which might change. You can find a button's own ID by inspecting it in your browser's dev tools, or from the Data Layer output shown later in Track One Button.
Replace the Google Ads ID, Conversion Label, and data-button-id with your own.
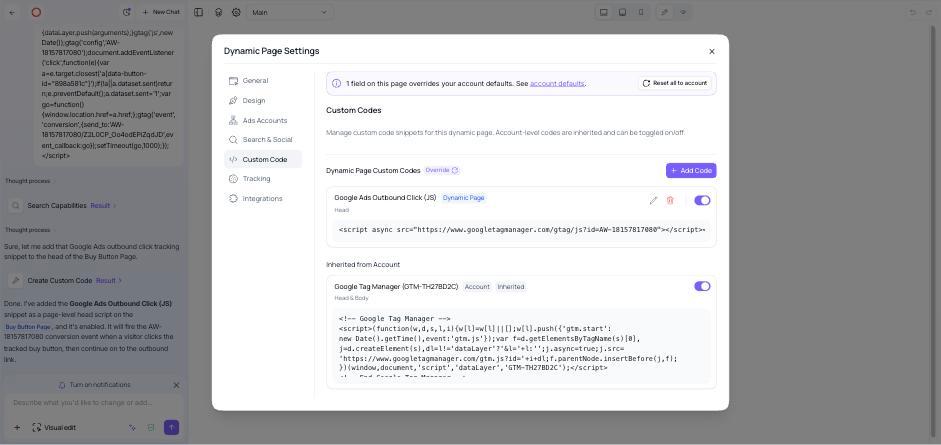
We published the page, opened the browser's Network tab, clicked the button, and confirmed a request went out to Google the moment we clicked. Then we turned the snippet off, since this demo also sets up the same tracking in GTM below, and running both at once double counts every click. Leave it on if you want to skip GTM and run Custom JS only.
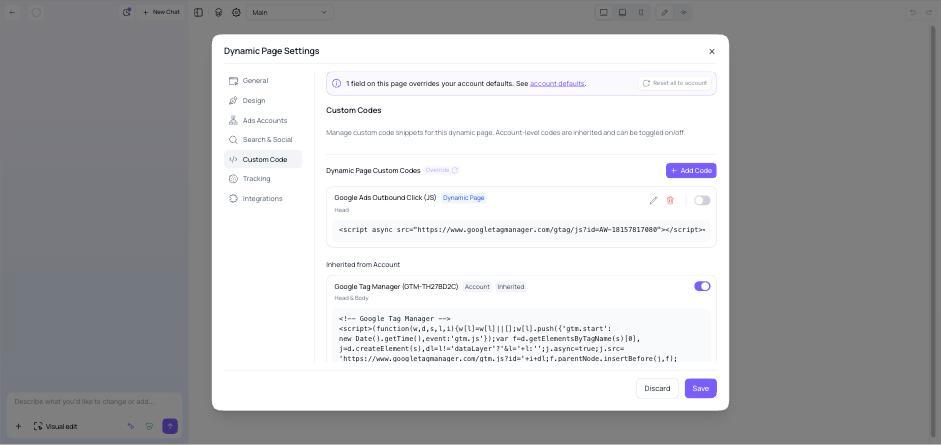
Option B, Google Tag Manager
Check GTM is installed for this page
Open the cog wheel in the top left of the page editor and check the Custom Code tab for the GTM container snippet.
See Google Tag Manager for where to get the container snippet and how to install it.
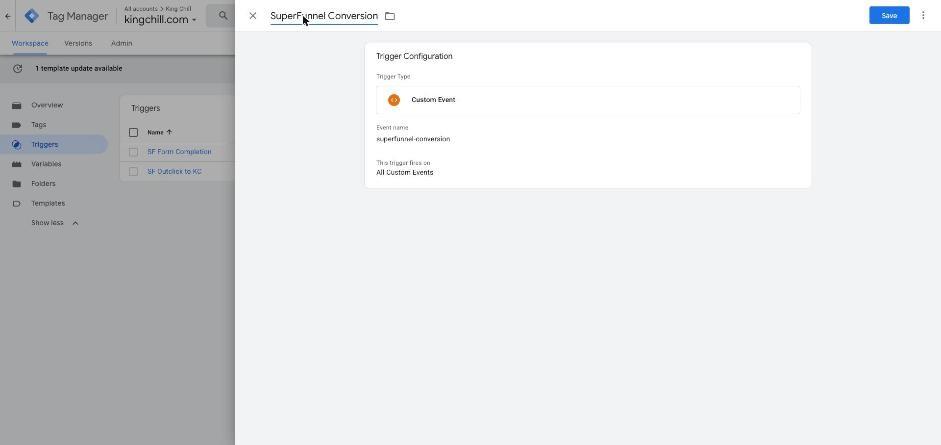
Create a trigger
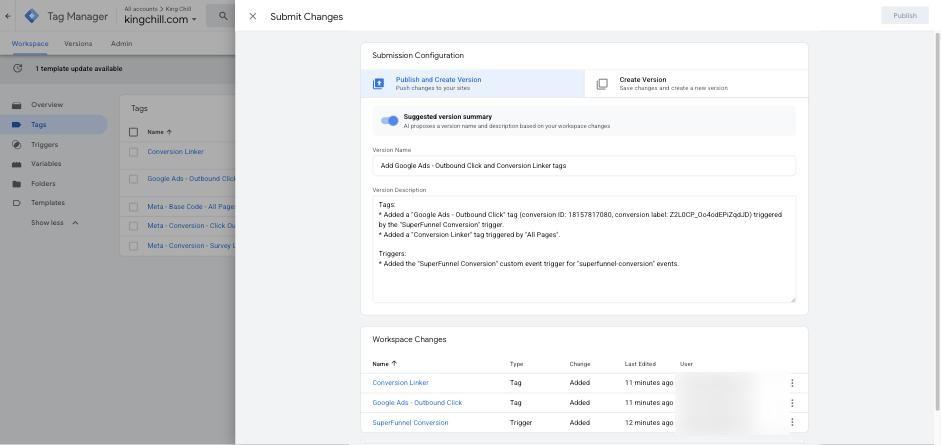
Add a trigger named SuperFunnel Conversion: type Custom Event, event name superfunnel-conversion.
Create the conversion tag
Add a tag named Google Ads - Outbound Click: type Google Ads Conversion Tracking, with your Conversion ID and Label, firing on the trigger above.
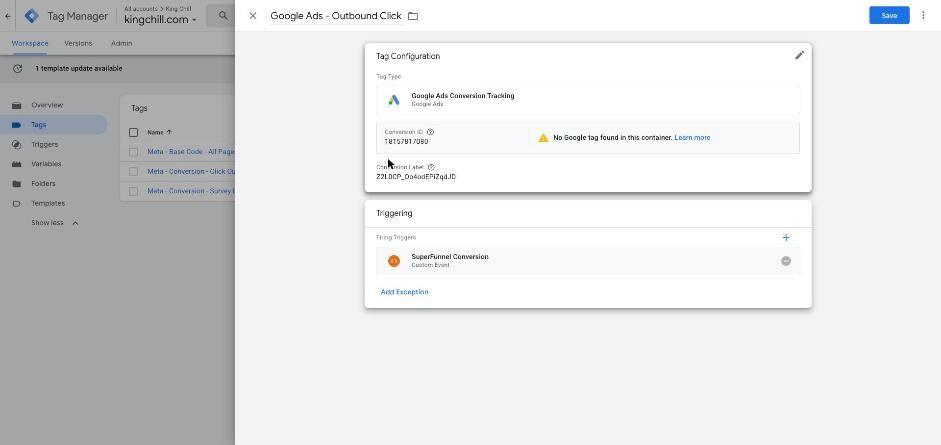
The yellow warning is safe to ignore
A No Google tag found warning may show here since no base Google tag lives in this container. It's safe to ignore in this setup.
Add a Conversion Linker tag
Create a Conversion Linker tag that fires on All Pages. This is what lets Google Ads match a later conversion back to the original click.
Test It
Open GTM Preview
In GTM Preview, enter your page URL and click Connect. The page opens in a new window.
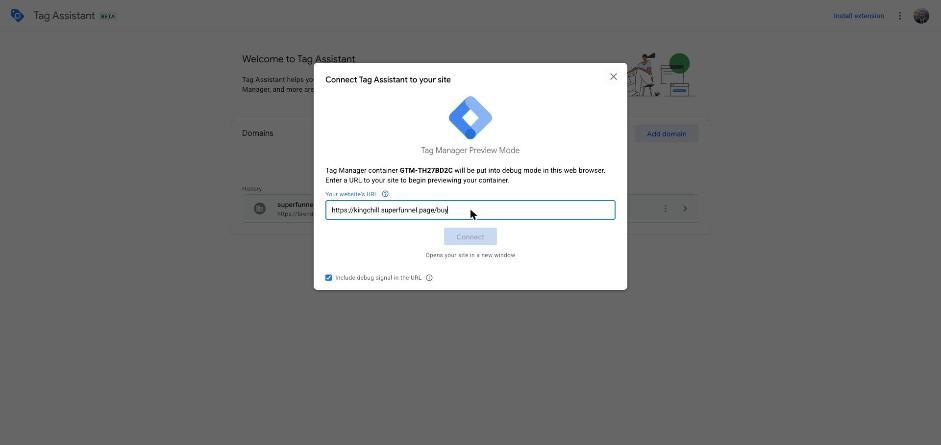
Click the button and check Tag Assistant
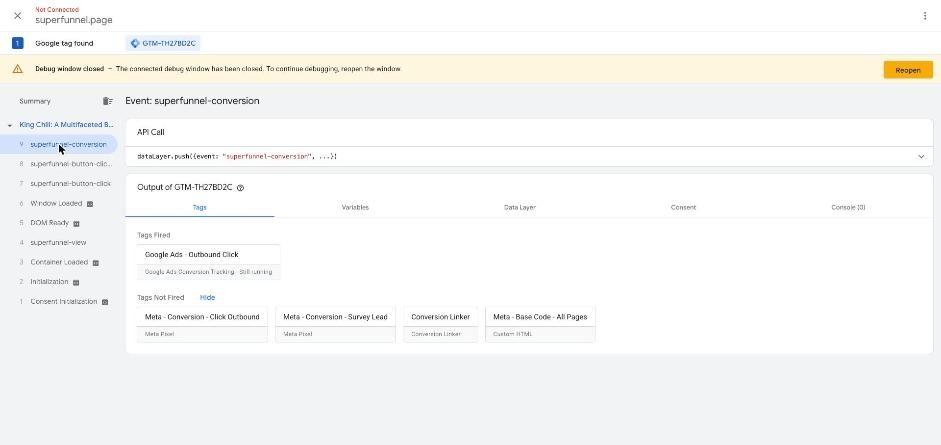
Click Buy. Back in Tag Assistant, the superfunnel-conversion event should show Google Ads - Outbound Click fired once. It may say Still running, that's normal since the page is navigating away.
Before the click, Conversion Linker fires on page load, and the Ads tag sits in Not Fired until the button is clicked.
Submit and publish
Once it works, click Submit, then Publish.
Track One Button Instead of Every Conversion
superfunnel-conversion fires for any conversion on the page, click-outs and form submits alike. To track just one button, add a Data Layer Variable for extra.buttonId, then set the trigger to Some Custom Events where that variable equals your button's ID.
Build the Campaign
Start a campaign
Create a campaign, choose Leads, then Search.
Match the objective to your conversion
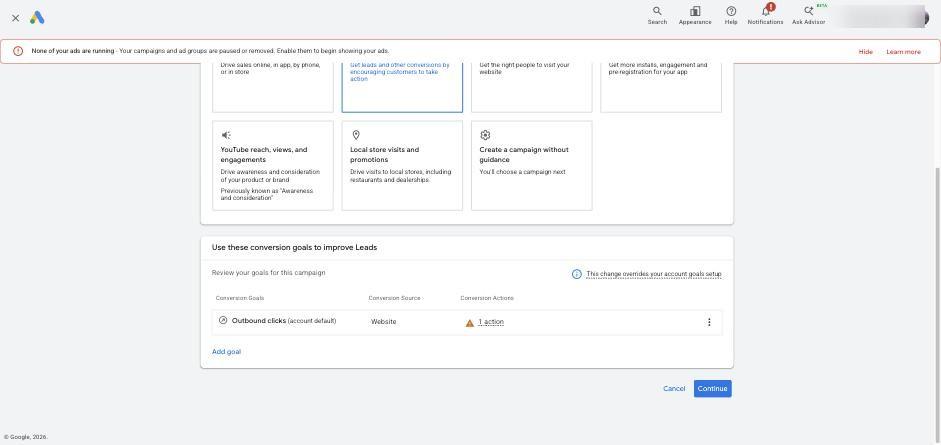
We chose Leads since our conversion is an outbound click. Selling directly on the page? Choose Sales instead, so Google optimizes toward purchases rather than leads.
Remove other goals
Remove every goal except Outbound clicks, so the campaign only optimizes for the conversion you just built.
Name it and set the destination
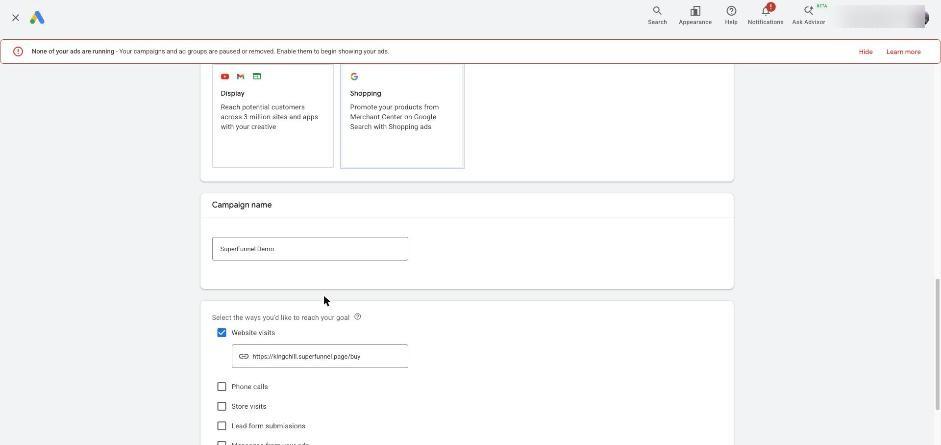
Name the campaign, for example SuperFunnel Demo. Choose Website visits and enter your page URL.
Set the bid strategy
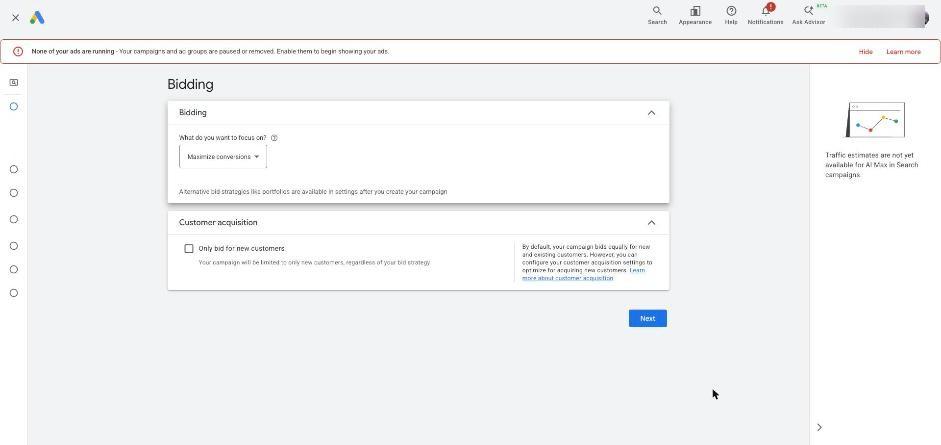
Set Bidding to Maximize conversions.
We stopped here on purpose
We saved this campaign as a draft rather than launching it, so it never actually ran. Everything above still works the same way if you want to go live for real.