

Ad & Integrations > Advertising
Google Tag Manager
Install a GTM container on your SuperFunnel Pages, then fire tags on events.
Overview
Google Tag Manager (GTM) is a free tool that lets you add and manage tracking tags, like the Meta Pixel, Google Ads conversion tags, or analytics snippets, without editing your page code every time. You install one container on your pages, then add and change tags from the GTM dashboard.
If you only ever need a single pixel, you can paste it straight into Custom Code and skip GTM. GTM earns its place once you are juggling several tags, want to map SuperFunnel events to platform-specific conversions, or want marketers to manage tracking without touching the funnel.
Three concepts make up every GTM setup:
- Tag — the code that runs, such as a Google Ads conversion or a Meta Pixel
Leadevent. - Trigger — the condition that fires a tag, such as a page view, button click, time spent watching a YouTube video, or any other custom event you define.
- Variable — a reusable value a tag or trigger can read.
Before you start
You need a Google Tag Manager account and a Web container. Create one for free at tagmanager.google.com. Have at least Edit and Publish permissions on the container.
Step 1: Get your container snippet
Create or open a Web container
In Google Tag Manager, create a new Web container (or open an existing
one). Each container has an ID in the form GTM-XXXXXXX.
Copy the install code
Open Admin → Install Google Tag Manager. GTM shows two snippets: one for
the <head> and one for the <body>. Copy both.
Step 2: Install GTM in SuperFunnel
Add the container globally using Custom Code. Enable for relevant pages and quizzes, then publish.
Open global Custom Code
Go to Settings → Website → Custom Code.
Add the head snippet
Click + Add Code, name it "GTM Container — Head", paste the <head>
snippet, and set the injection location to Header. Enable it.
Add the body snippet
Add a second snippet named "GTM Container — Body", paste the <body>
snippet, and set the injection location to Body.
Save and publish your pages
Save your changes so the container goes live on your pages.
Wait
Add a 1 ms delay to your snippets so they run after page elements render. See Custom Code for details.
Confirm the container loads
Open a live page, then check Preview mode in GTM (see Step 4). If the container connects, GTM is installed correctly.
Step 3: Fire a tag on a SuperFunnel event
SuperFunnel emits an event when a visitor submits a form, that is, reaches the final step of a quiz or form. You catch that event in GTM with a Custom Event trigger, then fire whatever tag you want.
The two examples below use the same trigger; only the tag differs, and you do not need both. Example A (Google Ads) is the most common setup, and it does not involve Meta or the Pixel at all. Use Example B only if you also advertise on Meta.
Two default events to choose from
SuperFunnel emits two built-in events you can use as the Custom Event trigger:
superfunnel-form-submission (the visitor reached the Final Step) and the
broader superfunnel-conversion (any conversion, including click-outs). The
examples below use superfunnel-form-submission. If your funnel converts before
the final step, swap in a custom event.
See Default conversion events.
Create the trigger (shared)
Both examples reuse this one trigger. Create it once.
Create a Custom Event trigger
In GTM, go to Triggers → New.
- Trigger type: Custom Event
- Event name:
superfunnel-form-submission - Name it "SuperFunnel Form Submission" and save.
Example A: Form submission → Google Ads conversion
If you advertise on Google, get Conversion ID and Conversion Label from Google Ads.
Create the tag
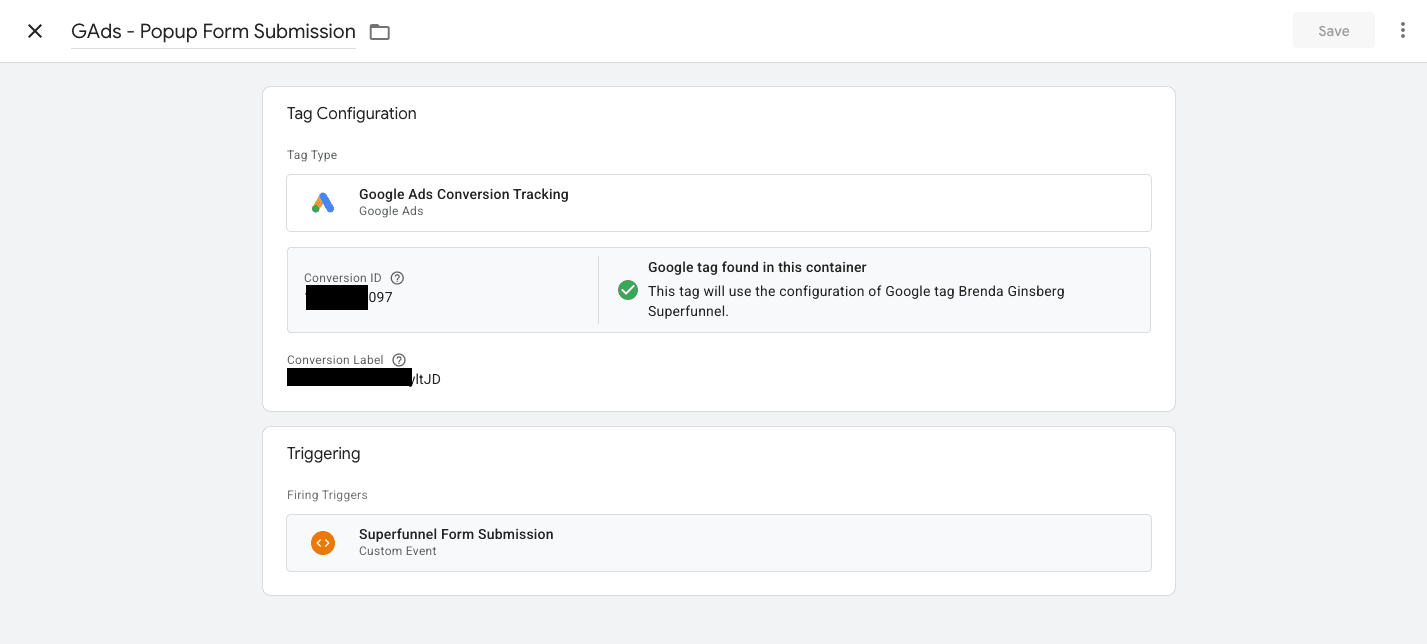
Go to Tags → New and name it "GAds — Popup Form Submission".
- Tag type: Google Ads Conversion Tracking
- Conversion ID: your Google Ads Conversion ID
- Conversion Label: your Google Ads Conversion Label
Attach the trigger
Under Triggering, select the "SuperFunnel Form Submission" trigger, then save the tag.
Submit and publish
Click Submit in the top right to publish the container so the tag goes live.
Example B: Form submission → Meta Lead
If you run Meta ads and want the submission to count as a standard Meta Lead event, follow this example. It assumes the Meta Pixel base code is already installed on your pages, see Meta Pixel.
Create the tag
Go to Tags → New and name it "SuperFunnel Form Submission → Meta Lead".
- Tag type: Custom HTML
- Paste the Lead event code:
<script>
  fbq('track', 'Lead');
</script>To attach a value for revenue reporting, add it inline. Here is an example where the lead is worth $25 USD:
<script>
  fbq('track', 'Lead', { value: 25.0, currency: 'USD' });
</script>Attach the trigger
Under Triggering, select the "SuperFunnel Form Submission" trigger, then save the tag.
Submit and publish
Click Submit in the top right to publish the container so the tag goes live.
Step 4: Test and verify
Open GTM Preview
In GTM, click Preview, enter your live page URL, and connect. A debug panel opens alongside your page.
Trigger the event
Complete and submit the form on the page. In the GTM debug panel, confirm the
superfunnel-form-submission event appears and your tag fires.
Confirm in the ad platform
- Google Ads (Example A): open Goals → Conversions and check the conversion registers. It can take time to appear.
- Meta (Example B): open Events Manager → Test Events, refresh, and confirm the Lead event arrives after you submit the form.
Done
When your tag fires once in GTM Preview with no duplicates and the conversion shows up in the ad platform, the setup is working and you can use it in your campaigns or ad sets.
What's next
Debugging Events
Inspect the page-load dataLayer event and fix the most common tag pitfalls.
Meta Pixel
Install the Pixel and learn how SuperFunnel events map to standard events.
Online Event Tracking
Fire your own on-page events with the SuperFunnel JavaScript API.
Offline Conversion Tracking
Report backend conversions to Meta and Google for server-side accuracy.
Custom Code
Where and how to inject scripts into your pages and quizzes.